Showing posts with label Sweet. Show all posts

Monday, 9 June 2014

Yogurt Parfait

Yogurt Parfait

Yogurt Parfait for breakfast has been my number one survival meal the past couple of days. Returning from a wonderful summer vacation is hard, but returning to super humid weather which almost isn't that hot yet you already seem to drip in sweat only by walking up the stairs is even harder. So after waking up early because of the temperatures and air a cooling yogurt with fresh fruit and crunchy muesli is what I opt for. But instead of simply topping a bowlful with some fruit and similar I like to layer the ingredients all up parfait style - all the goodness in every bit and no leftover plain yogurt without any toppings in the end. Smart solution at its best!

Yogurt Parfait with Muesli, Honey and Banana

To make it even better this one doubles as a visual eye-catcher because of the visible layers when served in a glass! So it can not only be served day in and day out as a breakfast staple but also accompany a beautiful brunching table on special occasions! Win-win situation! I've included the recipe for my favourite combination of banana, honey and muesli below, but don't be shy to throw in new combinations using a variety of fruit, chopped chocolate, granola/cereal, or even crushed cookies. The combinations are literally endless and you can be sure to have a new one every day!

Yogurt Parfait with Muesli, Honey and Banana

Yogurt Parfait Layers


Yogurt Parfait
- serves one
- 1 banana
- 3 Tbsp muesli
- 1 tsp honey
- 150g plain yoghurt

1. Slice the banana.
2. Drop one tablespoon of yoghurt into the jar, then sprinkle a taplespoon of muesli on top. Layer some banana slices on top of this. Now continue to layer yoghurt, honey, muesli, banana, yoghurt, muesli, banana, ... until the yogurt is used up.
3. Garnish with the remaining muesli, arrange the left-over banana on top and drizzle with some honey. Serve immeditately and enjoy!

Tuesday, 20 May 2014

Franzbroetchen


 I am providing you with an oldie but goldie today: a northern german speciality - Franzbroetchen! Usually they consist of a super soft yeasted dough, filled up with cinnamon sugar and rolled into the characteristic shape. A little similar to cinnamon rolls, yet that much better! Our family favourite uses an airy crossaint dough for the base, making the treat that much more special. Buttery yet airy dough filled with caramellized brown sugar cinnamon filling - need I say more?


I'm currently studying for my viva voce in history as a part of my A levels and let me tell you 200 years of history ain't easy on my brain... So when I'm all finished with my daily pensum it's all like blaaaaah, and that doesn't calls for any long blog posts. So today I let the pictures speak for themselves:


Make the recipe easier by using ready-made storebought crossaint dough, or take a little adventure through the foodie web to find a recipe for a homemade from scratch version. Whichever you may choose, fresh, slightly warm Franzbroetchen are sure to become a future family favourite!

Franzbroetchen
- makes 15-20 individual pieces
- 1 portion of crossaint dough (big enough to be rolled into a 40x60cm rectangle)
- 1/3 cup brown sugar
- 3 Tbsp ground cinnamon
- 3 Tbsp milk

1. Preheat your oven to 400°F/200°C. Lightly flour your working surface. Roll out your crossaint dough into a 40x60cm rectangle, about 3-5mm thick.
2. Combine all the remaining ingredients and spread onto the dough. Roll up into a "snail", starting from the longer side.
3. Cut the roll into smaller parts, each one about 3 cm. This combines to a total of about 15-20 individual parts.
4. Press each one flat with a wooden spoon like shown in the pictures below.


 Let them rise in a draught free place for about 20-30 minutes.

5. Arrange the Franzbroetchen onto a parchment lined baking sheet about 5 cm apart from each other. Bake in the preheated oven for 15-20 minutes until golden brown. Remove and let cool for 5-10 minutes before serving. Enjoy!

Saturday, 10 May 2014

Strawberry Chocolate Cheesecake Bars


Chocolate and Cheesecake Bars with Strawberries

Aand here it is - mother's day! Known as the one day where everyone magically turns into a baker, trying to mix up something delicious for the one and only number one in our world: mom!

I've always loved the preperations for this special occasion and can remember the good ol' primary school days when we would spend hours drawing the letters of poems on coloured papers and then give our best to individualize those with all colours available ;-). It was fun!
And the moment you can proudly present mom your present just seeing the smile on her face makes it all worth it (from a childrens point of view).

Nowadays just like Valentine's day I think it's much more important to show your loved one's your appreciation and love on a daily basis, yet I'm always all in when someone asks me for a fail-proof recipe which he or she wants to try out for his or her loved ones. No kidding: this time it has got ALL the essentials: Strawberries, Chocolate and Cheesecake! And for an easy feasting these ingredients come together in form of a light bar - just grab it casually with your hands for pure enjoyment or eat it sophisticatedly from a plate with a fork - your choice or moreover your mother's 'cause you sure want to make these for her (but pssst... don't tell her how easy it actually was ;-)).

Strawberry and Chocolate Cheesecake Bars

Strawberry Chocolate Cheesecake Bars for Mother's Day

These bars have been approved by my whole family, so don't be shy to bring them to a family breakfast, brunch or coffee time tomorrow (or any other day of the year as these taste superb even on "non-mother's-day-days") - no kind of "you've-included-chocolate-and-peanut-butter-in-a-cake-???" kind of moments, I swear!

The base actually looks like a super fudgy brownie and yes, it's deliciously fudgy, yet without all the dense texture we all are well known to, because the base actually consists of a light cake batter with cocoa powder, which is baked until just right! Nevertheless it sure doesn't lack in chocolate taste! Casually swirl some cream cheese on top pre-baking and don't forget a good sprinkle of strawberries (or other fruit/berries of choice) for the fresh accent. Oh, and have I mentioned that these are ready within half an hour? So even if it's mother's day already, I am sure you can still deliver them to your favourite person in the world!

Happy mother's day to everyone out there!


Strawberry Chocolate Cheesecake Bars
- makes enough for an 8x8inch pan
Chocolate Base:
- 1 and 1/2 cups flour (I used Whole Wheat)
- 1/2 tsp salt
- 3/4 cup sugar
- 5 Tbsp dark cocoa powder
- 1/2 tsp baking powder
- 2/3 cup milk
- 2 Tbsp Cream Cheese

Cream Cheese Swirl:
- one packet (125g) Cream Cheese
- 1/3 cup sugar
- 1 Tbsp flour

- a handful of strawberries, sliced or cubed for the topping

1. Preheat your oven to 175°C/350°F.
2. Prepare the cream cheese: Beat together the cream cheese, sugar and flour until combined. Set aside.
3. Make the chocolate base: Mix together the flour, salt, sugar, cocoa powder and baking powder. Then stir in the milk and cream cheese. You might need to add 2-3 Tbsp of Milk if your batter is to thick.
4. Pour the batter into a greased or lined pan. Spoon the cream cheese in 6-7 portions on top, then swirl in the cream cheese with a fork so, that it still stays at the surface, but is distributed well.
5. Sprinkle the strawberries on top and press them in slightly. Bake for 20-25 minutes until set in the middle. Remove and let cool before slicing. Enjoy!

Friday, 18 April 2014

Apple Galettes

Apple Galettes


It's Easter time! And I think we all know what that stands for - long family meals, endless chats and of course the always too many chocolate eggs. That's why I skipped my initial plan of yet another chocolate based recipe to inspire your culinary easter and opted for these little goodies instead: Apple Galettes!

These freestyle tartlettes are made up from a whole wheat crust and a super fruity apple-starring filling all spiced up with my all time fave cinnamon - pure bliss yet not overly sweet, so instead of a sugar coma they are a tad bit more nutritious and light. That definitely calls for some honey whipped cream as a partner ;-) (recipe below). Or skip the whipped cream and serve them at Sunday's Easter brunch. For this occasion egg-shaped galettes might be a nice idea to entertain friends and family.

Saturday, 12 April 2014

Rhubarb Magic Cake


One Batter, seperating into three layers: soft, melt-in-your-mouth cake on top, a thick custard in the middle and a thin cake layer on the bottom - this is what makes up the magic custard cake/pie.

Now it's already fabulous on it's own already but imagine pairing it up with some speckles of fresh rhubarb, cooked with a little brown sugar and cinnamon: magic cake perfection!


I've had my veeeery last day of school yesterday, eight years of grammar/high school have passed really fast and the past months have been an emotional roller-coaster between total euphoria and depressional moments - happiness about starting into a self-determined post-school life while yet leaving the structure that was well known for years. But hey, that's life and I'm all in for the great moments that are ahead once the missing exams and viva voce are done and once I (hopefully and finally) hold my leaving certificate in my hands.


But back to the cake, before I am boring you with my inner mindset about studying all the stuff of the past two years...
Magic days call for magic cakes and thus this one was created, based on the awesome version from the White on Rice Couple which can be found here.
I've used a little less sugar and obviously added in the rhubarb which gives the cake a nice fruit-y and spring-y accent. The thick custard layer is incredibely light which makes this recipe perfect for the warm days - bake it a day before serving, leave it in the fridge over night and you're ready to go the next morning/day (And btw will be the hit of the party when you tell them that this cake is made out of just one batter!)! No rhubarb? No problem, just switch it up with some berries, apples or pears according to your liking. I've also seen chocolate chips being added in in some places ;-). Now try it out on your own and be surprised by the magic that can happen in your own oven! Hope you all are having a nice start into the spring break/easter holidays - take it slow (bake some cake ;-)) and enjoy the days off with family and friends!

Rhubarb Magic Cake
adapted from this recipe by White on Rice Couple, yields one 8x8 inch cake
- ~400g Rhubarb
- 1 Tbsp Brown Sugar
- 1/2 tsp Cinnamon
- 115g/ 1/2 cup Butter
- 480ml/ 2 cups Milk
- 4 Eggs
- 1/2 tsp Vinegar
- 100g/ 1/2 cup minus 1 Tbsp Sugar
- 1 Tbsp Water
- 120g/1 cup All-purpose Flour

1. Wash, peel and cut the rhubarb into cubes. Mix it with the Brown Sugar and Cinnamon. Then either heat it in the microwave on high for 2 minutes or in a small saucepan on medium high heat for 5 minutes until soft yet not falling apart completely. Set in a fine sieve to drain off most of the liquid and set aside to cool down.
2. Preheat your oven to 325 °F/ 160°C. Grease or line an 8x8 inch pan with parchment paper. Melt the butter and set aside to cool.
3. Warm up the milk until warm to the touch.
4. Seperate your eggs and whip up the egg whites with the vinegar until stiff peaks form.
5. Beat together the sugar and egg yolks, then add in the butter and water and continue beating until well mixed for 1-2 minutes.
6. Quickly add in the flour and then carefully beat in the milk until well incorporated.
7. Carefully fold in the egg whites (I've done this in two batches, the original recipes calls for adding it in 1/3 at a time).
8. Slowly pour the batter into the prepared pan, then sprinkle the rhubarb on top and bake it for 50-60 minutes until the top is golden brown and a skewer inserted comes out with just some custard attached. Take it out and leave it to cool in the pan for 30 minutes, then put it in the refrigerator for at least 1 hour to overnight. Enjoy!

Saturday, 8 March 2014

Toasted Rye, Browned Butter and Black Tea Chocolate Chip Cookies


Toasted Rye, Browned Butter and Black Tea Chocolate Chip Cookies - ugh, ten words, 54 letters and a title for a blog post where I actually also wanted to add: "How to toast flour", but left it out to keep the overwhelming effect in check. Nevertheless these little bad boys just happened in my kitchen.
And let me tell you, the moment they came out of the oven I knew the long post title just had to happen - these are so good, I would've felt guilty for not sharing them with you!

It all actually started with this recipe from food52, a classic one for Whole Wheat Chocolate Chip Cookies. Since glancing at the photos mid-week I knew I had to bake some cookies on the weekend - as a method of stress relieve, you know (the usual: lots of studying currently going on). But because my mind is actually really good at associative thinking (and btw non assotiative thinking as well) the idea of using toasted flour came up. Aaand because I've a current crush on rye, Toasted Rye Chocolate Chip Cookies it should be.

Opening the refrigerator the other day, I saw a tiny little packet of butter, that was soon to expire - this was the reminder of my long time intention to finally try out browned butter in baking - you see, now I was all in for Toasted Rye and Browned Butter Chocolate Chip Cookies.

In the end black tea was the last one to join us on the road to the most-fantastic-totally-need-to-try-out-no-joking-run-to-the-kitchen-immediately Toasted Rye, Browned Butter and Black Tea Chocolate Chip Cookies.


So Saturday morning was spent in the kitchen: dancing (thanks we're having a home where no one can glance in the kitchen to be amused by my terrible dancing skills...) from the counter to the oven and back - mixing up the dough, adjusting the mix of ingredients, shaping the cookies and sitting in front of the oven like a child, anxiously waiting for the baking time to be over. From the toasting of the flour, to the browning of the butter and the final baking of the cookies - the kitchen was bursting with aromas from popcorn (toasted flour) to caramel and nutty shades- can someone hand me a mason jar so I can preserve this smell? Because it gives you a total mood-boost, huge smile included!

The final cookies are crisp, with a slightly chewy centre (you might lower the baking time by 2-3 minutes, if you're one of the chewie cookie lovers though), huge chunks of chocolate chips, that are actually melting in your mouth. The whole thing has an awesome deep flavour that shimmers from rich butter and caramel to a hint of black tea and a wholesome nutty accent of the toasted flour - I actually had to hide some so they wouldn't be mysteriously gone once I was ready to shoot the photos. So if you're looking for a super tasty, "full bodied", unexpected cookie recipe, that even satisfies the pickiest eaters as well as sophisticated taste buds, this is THE one for you! Now take out the ingredients and start whisking - you'll be suprised by the magic that can be achieved by simple steps like browning butter and toasting flour!


Toasted Rye, Browned Butter and Black Tea Chocolate Chip Cookies
- inspired by this recipe from Food52, makes 25-30 Cookies
- 1 cup/225g Butter
- 2 and 1/2 cup/300g Rye Flour
- 1/2 cup/115g Sugar
- 1/2 cup/115g Brown Sugar
- 1 egg
- 1/2 tsp Salt
- 1/2 tsp Baking Soda
- 1/4 tsp Baking Powder
- Content of three black tea bags
- 200g Chopped Dark Chocolate or Chocolate Chips (I used 60%)

1. Cut the butter into pieces and add these into a medium sized saucepan. Put it on the stovetop on medium high heat until melted and simmering - whisk constantly until the butter starts to get slightly brown and has a nutty, caramel taste (about 4-8 minutes)- pour into a heat proof bowl and set aside to cool down.
2. Toast the flour: See below for detailed instructions with gifs. Working in two to three batches add your flour into a medium sized pan and put it on the stovetop on medium high heat. Stirring occasionally toast your flour until slightly brown and your kitchen smells like popcorn: ~7-10 minutes. Set aside to cool down.
3. Preheat your oven to 350°F/175°C.
4. In a mixing bowl beat together cooled butter, both sugars and the egg for about two minutes. Add the salt, the tea, baking soda and powder to the flour, mix well and work the dry ingredients into the wet with a wooden spoon or your hands until a dough starts to come together. Finally add in the chocolate until well combined.
5. Line your baking trays with parchment paper and form little dough balls (about 1/2 to 1 inch in diameter). Set these on the trays, about 3 inches apart to prevent the cookies from baking into each other. Bake for 8-11 minutes until slightly browned (if you like chewy cookies take them out when they still seem a little underbaked - they will harden up once cooled). Take out, let cool and enjoy!

How to toast flour
Toasting flour really gets out all the taste of the used grains and provides a lovely nutty aroma in the final product.

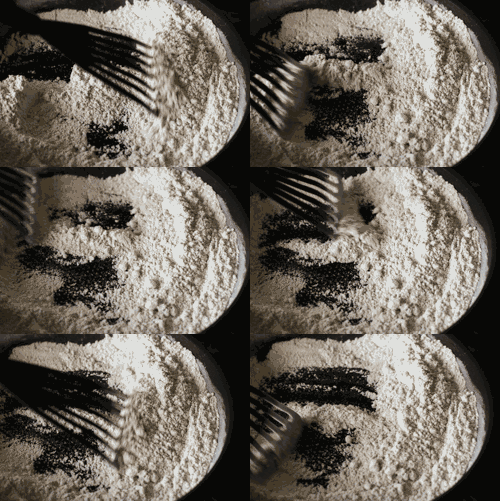
1. Put the flour in a pan, so the bottom is covered. Set the heat on medium-high.


2. Start toasting your flour, stirring occasionally.


3. Once it starts to get slightly brown stir more frequently to prevent from burning.


4. Put the toasted flour in a seperate bowl to cool down a bit. Use immediately


                                              ____________________________________


Sunday, 2 March 2014

Berliner {Jam filled doughnuts}


It's carnival! You know, this crazy festival, when everyone dresses up and a lot of loud music and party is included, to celebrate one last time before the pre-easter fasting period begins.This calls for a lot of celebrations in form of parades, full in costumes and everything. And of course, since being located in a true carnival region: a lot of feasting on the obligatory deep fried sweet baking goods like "Krapfen", "Auszogne" or "Mutzenmandeln" (a visit of a well known search engine might help to get a basic picture of how much you can really make with as little as flour, sugar and fat ;-)).

The ultimate classic alias "king of carnival" in the category of baked goods around here is a jam filled doughnut or "Berliner" (no, no cannibalism included, I swear!). Nothing beats the super soft yeasted dough, rolled in sugar and filled with a generous amount of jam - pure bliss! Nowadays you can get it year round, so make sure to try one once you visit Germany, it's a must have!


But as they're "in season" now, it's nearly impossible to try all the different varieties that are currently served in the bakeries: all kinds of chocolate, all kinds of jam and different creams like vanilla or egg liqueur just to name a few. Berliners for breakfast, brunch, lunch and dinner is what it calls for.

As we have this tradition of celebrating carnival with a brunch on "Tulip Sunday" I chose to prepare some homemade "Berliners" as a special treat. And oh, boy they were gooood!! The ones out of the bakeries are great, don't get me wrong, but a fresh, still warm one - nothing better! And to even top it, you can make them year round at home, this leaves us with the chance to try out all the different fillings one by one, need I say more? Get your yeast and flour going and enjoy some within hours! Happy carnival everyone!


Berliner {Jam filled doughnuts} (American measurements will be up tomorrow!)
-makes 15 regular sized or 25 small ones
- 125 ml milk
- 1 packet active dry yeast
- 500g flour
- 30g sugar
- 1 tsp salt
- 2 eggs
- 100g butter
- 300g jam or filling of your liking (e.g. chocolate spread)
- 750 ml oil for frying
- 100g sugar or powdered sugar for dusting

1. Slightly heat your milk, then add in your yeast and let sit for approximately 10 minutes until foamy. In a huge bowl mix together the flour, sugar and salt, add in the yeast-milk-mixture, mix and let sit for a couple of minutes, then add in the eggs and butter.
2. Knead for 5-10 minutes until a soft, pliable dough has formed. Let sit at room temperature until doubled in size (~2 hours) or leave it to rest in the refrigerator overnight.
3. Knead the dough once more, divide into equal parts and roll them out into like-sized rectangles on a lightly floured surface. Mark circles on one of the rectangles with a cookie cutter or knife, then add a tsp of jam into the middle of each circle.
4. Layer the other dough rectangle on top and cut out the jam filled circles with your cookie cutter or knife. Continue to do so until all dough is used up. Place on a lightly floured surface, cover with a tea towel and let sit for further 15 minutes.
5. Heat the oil in a heavy pot until bubbles form immediately when a wooden spoon is placed inside, this means the fat is hot enough. Carefully add in two-three berliners into the fat, put on the lid and fry for 2-3 minutes, then remove the lid and turn them over on the other side and continue frying until lightly browned. Take out, pat off the fat and dust with (icing) sugar when still warm. Repeat with the remaining doughnuts. Serve and enjoy!

Saturday, 22 February 2014

Poppy Seed Tartelettes

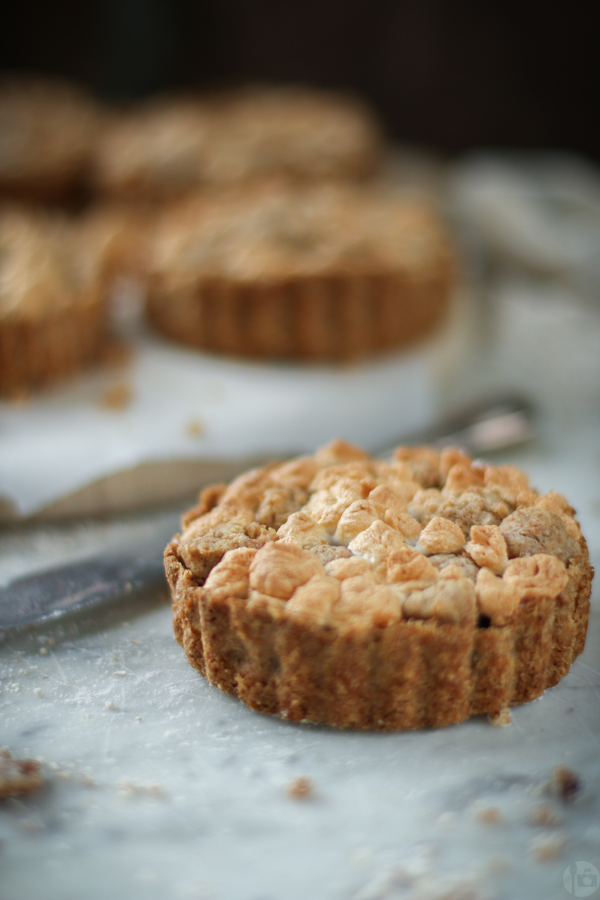
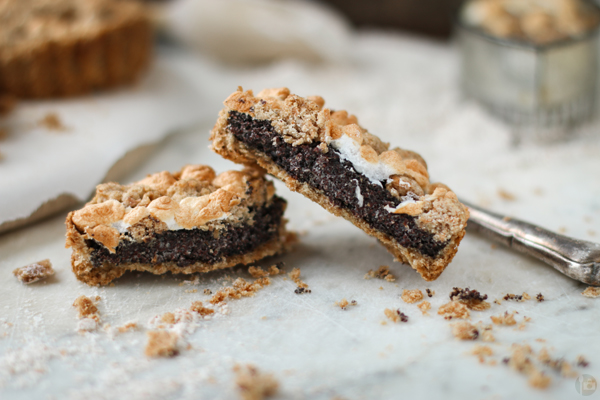
Poppy Seed Tartelettes with streusel and meringue

It's a special person's birthday next week. And what's one to do to show the most important woman in the whole wide world alias mom how much you love her?

Arrange a small pre-birthday present i.e. bake mom an ultimate weekend treat starring one of her all time favourite ingredients, one that pairs up beautifully with her beloved good ol' british tea.
In this case that means a dessert loaded with poppy seeds - seriously not just a cake with some poppy seed speckles or a sweet yeasted loaf where you might accidentally stumble across some poppy seeds in the filling - no, just pure, honest and true poppy seed goodness: pitch black and with the lovely, characteristic nutty taste.

Poppy Seed Tartelettes with streusel and meringue

Poppy Seed Tartelettes with streusel and meringue

To achieve that I went for a lovely buttery whole wheat crust to wrap the velvety filling up, topped it with some streusel made from the same dough and then piped a little meringue on top to really give the poppy seeds a "canvas" where it can pop out and be the absolute star for the taste-tasting gourmet (or my sister, who started asking for more immediately while still munching on her first bit - if that's no sign for true poppy seed perfection I don't know what it is ;-)).

Poppy Seed Tartelettes with streusel and meringue

And oh boy, those were a hit in the whole family (of course especially my mom was suuper excited - mission accomplished!)- it was pretty hard to keep enough for next day's coffee time, every last crumb was gone in the end. To make it a really simple recipe, the dough for the crust and streusel can be prepared the night before the day when served and the meringue will only use the remaining egg whites of the yolks that are used in the filling, so you won't end up with any egg parts that have to be used up soon - easy peasy but a sure rock star when served!

Poppy Seed Tartelettes with streusel and meringue

Poppy Seed Tartelettes with streusel and meringue

Poppy Seed Tartelettes
- with Streusel and Meringue, makes enough for 12 Tartelettes, 4inch/10cm in diameter or one regular sized tart pan
Crust/Streusel:
- 2 and 1/2 cups/300g Flour (I used Whole Wheat, but All-purpose works great as well)
- 1 and 1/8 cups/200g Butter
- 1/2 cup/100g Sugar
- 1/2 tsp Cinnamon

Filling:
- 1 cup/240 ml Milk
- 5 Tbsp Sugar
- beans from 1/2 a scraped Vanilla pod (omit completely or substitute 2 Tbsp of sugar with vanilla sugar, if you don't have one on hand)
- 1 Tbsp Butter
- 1 Tbsp Flour
- 1/2 tsp Cinnamon
- 2 cups/200g grinded Poppy Seeds (or grind them yourself)
- 2 egg yolks

Meringue:
- 2 egg whites
- 5 Tbsp caster sugar

1. Prepare the crust (this can be done a day ahead, so you save time on the day when served): Mix Flour, Sugar and Cinnamon, then work in the butter with your hands or a fork until a dough comes together. Wrap in plastic foil and leave in the refrigerator to rest for at least 30 minutes to overnight.

2. Preheat your oven to 180 °C. Grease and flour your tartelette pans/tarte pan well. Divide the dough into three equal parts. Crumble one part into a bowl and set aside for later use. Divide the remaining two parts in six smaller parts each, if using tartelette pans, so you end up with twelve equal parts for the crust. Press the parts into the prepared pan(s) and prick with a fork. Blind bake for 10 minutes.

3. Meanwhile prepare the filling: mix the milk with the sugar, vanilla, butter and cinnamon in a saucepan and set on medium-high heat, stirring occasionally so it won't burn, until butter is melted. Take off the heat and add in the flour and the poppy seeds. Let cool for a further 2-5 minutes until warm to the touch, then add in the egg yolks and mix until well combined.

4. Scoop the filling into the ready baked crusts and spread evenly. Add the Streusel on top, leaving some empty spots on top of the filling for the meringue. Bake for a further ten minutes.

5. Meanwhile beat your egg whites on high until soft peaks form, then carefully add in the caster sugar and continue beating until you've got a glossy meringue. Pipe or spread it on the empty spots on the still hot tarte/tartelettes and go for a final 5-10 minute bake until the meringue is slightly browned on top. Take out, let cool, carefully remove from the pans and enjoy!

Poppy Seed Tartelettes with streusel and meringue

Sunday, 16 February 2014

Whole Wheat and Spelt Cinnamon Rolls {five ways}

Cinnamon Rolls close-up


Weather - we're confronted with it daily, the good and the "bad" (to be true, there's absolutely no bad weather for me, just the wrong clothing), the awakening, warm sunshine or the cold and i'd-rather-stay-in-bed-all-day-long kind of rain storm. A lot of the last one has been going on 'round here lately and to be true I can only dream of all the perfect snow storm situations that keep flooding instagram lately - want this right now, so don't hesitate to send some over soon ;-).

When the storm's all like: "I am going to make her feel like she's walking on a treadmill" and the rain wants to have it's part too by drenching you in water (not even stopped by a rain jacket or rubber boots...) it is fun as long as your outside, but wants back home some true comfort food is what I crave. And baking might be a really good way to get me right that - if I only would've time for it...

Why not you ask? To sum it up in one word: studying. Whose idea was it that if you'd like to finish school with good grades you have to analyse texts like a genius, solve maths problems like its no one's business, be able to educate your conversational partner about the past 200 years of history without any gaps and last but not least have to understand the whole damn neurobiology that's going on indide of your body 24/7? I'm not even talking about the remaining subjects here... So if anyone knows the one responsible for all this I'd like to have a his/her phone number for a detailed conversation 'bout it, okay?

Whole Wheat Cinnamon Rolls


Friday, 20 December 2013

Almond Cookies with Dates and Chocolate {and a very merry Christmas y'all!}


I wish you all a very merry, bright and happy Christmas! I hope you enjoy this special time of the year with friends and family all united cherishing the birthday of Jesus, the community of your family or the act of gifting each other!


As you read this post I'm quite possibly already digging my toes in the golden sand, turning my face towards a glorious sun after devouring some delicious food from the buffet. I now, it might be unfair to tell you, but I'm in the lucky position to spend this holidays with my family a little further away from home (and the rainy, grey and dreary weather ofthe past weeks...) in the beauty of some warmer climate and one of the loveliest hotels around.
My days will be filled with sleeping, resting, reading (4 books packed!) enjoying time with my family and of course: EATING - aaaaalll day long! :-P


This calls for

Sunday, 15 December 2013

Baumkuchen and the stories of the trees' rings


Countless rings, enclosing or seeming to move into each other or seperated by a dark line. That's what you see when you cut through a tree trunk. Each and everyone telling it's own story, good and bad, happy and sad - all different and unique, standing for all the years the tree lived to see.

Since being old enough to understand the meaning of these tree rings I was always attracted to what the trees could tell us (if they could only speak...) - all the things that happen in those centuries a tree might go through, standing still and massive - strong roots deeply reaching into the ground with nearly nothing that can disturb them and leaves that hear every whisper.


We most definitely won't live as long as our loved green friends, but instead we have the opportunity to tell stories to following generations. Reporting what great minds went past us (to stick with the tree metaphora), what they've told or shown us or what we've experienced on our own.


One of those great minds was Nelson Mandela,